Showing posts with label cotton. Show all posts

Thursday, October 12, 2017

Summer Sleepwear

Summer pajamas

This pajama set was sewn for August's Wardrobe Builder sleepwear challenge (from Laura at The Petite Passions). I was inspired by Closet Case Patterns Carolyn Pajamas, but rather than buying another pattern to add to my already too big collection, I decided to use 2 patterns already in my stash: BurdaStyle 12/2014 #133 (free on the BurdaStyle website) and McCall's 2101 (OOP but a copy is available on Amazon).
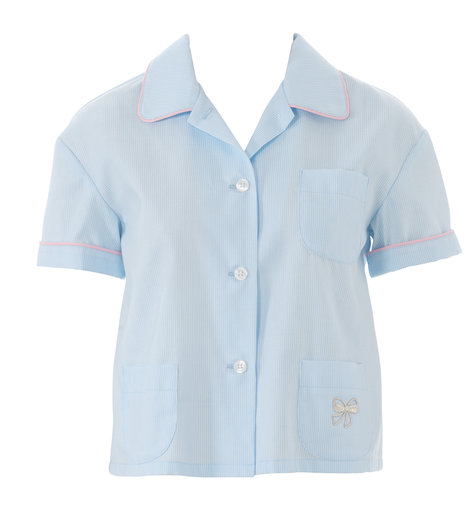
BurdaStyle 12/2014 #133 Pajama Top

McCall's 2101 Drawstring Pants

BurdaStyle 12/2014 #133 is a drop shoulder button up pajama shirt with a deep back pleat. I cut a size 38, but narrowed the front and back by 1 inch (I was concerned there would be too much wearing ease for my taste). I drafted separate front facings, a pocket facing, and separate cuffs for piping insertion and also added piping to the collar. I left out the bottom pockets and changed the straight hem to a shirttail hem. Based on fit in the shoulders, I will add back the ease I removed for my next version! I think I also need to lengthen the top.


McCall's 2101 is a pattern for drawstring pants. I sewed view E (the shorts), size medium with about 1.5 inches of ease taken out of the hips (I will add a bit back for the next version). I adjusted the crotch to fit my pants sloper a bit more closely while still maintaining a relaxed fit. I drafted separate cuffs to allow piping insertion and added seamed pockets and a faux fly.


The fabric came from a set of old sheets. I didn't realize the fabric was directional with a different shade depending on which way is up until my husband pointed out that the top and bottom of the set are different colors! Oops. Good thing they're just pajamas!

Piping detail. Buttons from my stash. 


I used a soft cotton fabric from my stash to make the bias binding for the piping. There was enough of this fabric left to make a camisole as well! 

I have  been wanting to find a TNT cami pattern, so I made the Diana cami from Spit Up and Stilettos/Sew Loft (free pattern hosted at Hoopes Parks Studio), size S at the bust graded to M at the waist in the soft pink cotton. I compared this to the Ogden cami from True Bias (size 2) in a pink and purple quilting cotton (also from my stash). The Odgen is one of my #2017makenine, so it feels good to check that off! Neither pattern has any darts to worry about. The Diana is finished at the top with bias binding and has an interesting back strap style; the Ogden is finished with a facing and is definitely a faster sew!

Here's the Diana:


Back detail without hair in the way!
And the Ogden:


(Right strap is sewn in properly -- just twisted in the photo!)

I prefer the way the Ogden fits me, though I will probably use the Diana back detail again at some point. I love that the Ogden takes less than 1 yard of fabric and that it's such a quick sew! Unlike the Diana, it's not free, but it's very well drafted and is a nice basis for hacks (see True BiasThreadbear Garmentstrine.schroeder, lindsayinstitches, and Sew Busy Lizzy). There's a reason it's so popular in the sewing blogosphere! I will be sewing up several more for winter layering in a drapier fabric than quilting cotton. 😉 I also plan on making the pajama set again for winter in a pink and purple striped cotton flannel. I will make the pants long, but keep the top short sleeved.

This last summer I also made a robe, so my summer loungewear is complete! I used the free kimono Robe pattern from Connecting Threads. The dark purple fabric was a sheet rescued from the thrift store and the lining fabric is more of the lavender sheets the pajamas are made from. I used the patterned portions of the sheet for the back, cuffs, and collar and added ribbon belt loops for the tie. At the moment it's the perfect weight, though I may want to make a heavier robe for the dead of winter!


Do you have a TNT camisole pattern that you prefer? November is TNT month at the Sewcialists--the perfect chance to find one and make a few camisoles!

Thursday, May 4, 2017

Maternity Non-maternity Tops


As part of my maternity sewing plans, I made some woven tops that will fit for much of my summer pregnancy, and will still be wearable when I am no longer pregnant!

Inspired by Erica Bunker's version of McCall's 7542 and spurred on by McCall's Sewing Contest, I made view D of M7542 (trumpet sleeves, longer bodice):
The fabric is a printed cotton blend from a thrift store. It was originally a salmon pink, but I dyed it with some brown Rit dye and got a lovely dusky rose.


I lengthened the bodice by 1 inch, and could probably have used at least another 1/2 inch. I graded from a size 10 at the bust to 12 at the waist (usual for me in Big 4 patterns). The neck is finished with bias binding in a soft pink cotton (I'm not a huge fan of facings) as is the hem (to keep every centimeter of length). Rather than a hook and eye, I used a button and thread loop at the back of the neck. I set the sleeves in flat, then added the trumpet portion after sewing up the side/underarm seams. This shirt will definitely be worn when I am no longer pregnant, though I may take in the sides a bit.


Inside finishing
Working with the original free Sorbetto pattern from Collette (here's the new version, which I haven't tried), I lowered the neckline and underarm seams, omitted the front box pleat, and slashed/spread both the front and back bodice to create an A-line shape. Next time I will also lower the bust dart. I used a floral light-blue linen from Vogue Fabrics Outlet in Evanston, IL, which I bought last spring (not available online). I used French seams for a clean finish and self bias binding for the neck, arm, and hem finishing. I will certainly make this again!


Wrinkles from wearing all day!
Inside finishing


My next post will outline my entire pregnancy sewing plans!


Friday, April 28, 2017

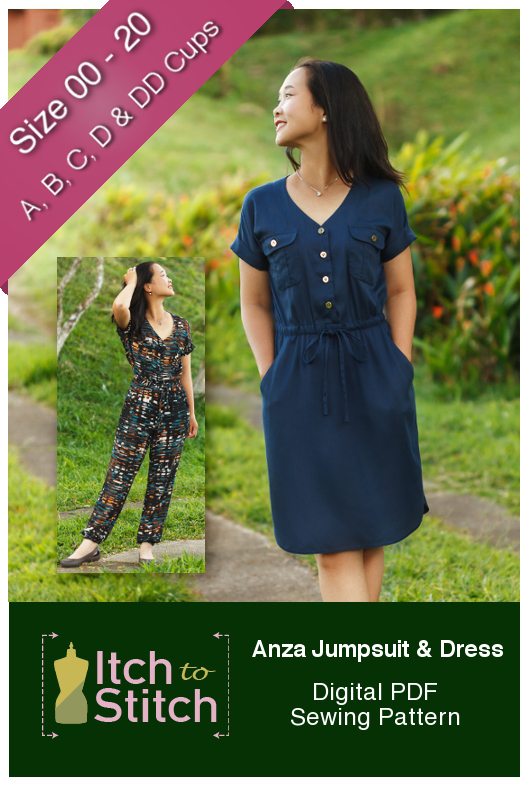
Testing the Anza Jumpsuit


I was very lucky to be able to test the Anza Jumpsuit by Itch to Stitch. This was my first experience testing, and it was quite fun to see the pattern "first" and see my feedback incorporated into the final product! Kennis was a joy to test for, and it was fun to see the inspiration of everyone else's makes coming together on the Facebook testing page. I am very pleased with the final result of my make, but I have definitely been inspired to plan another jumpsuit version and a dress version as well!

Love the pockets!
Things I particularly like about the PDF are the "layers" feature, the tile layout on page 7, the table listing tiles for specific views to save paper (page 6), and the complete body and finished garment measurements on pages 3 and 4. I always like to calculate the designer's ease to compare it to my own preferences, and often adjust this. However, as I was testing I cut the recommended sizes for my measurements, and I find the amount of ease perfect. I cut a 2 at the bust and a 4 at the waist/hips (the size at the hips must be followed at the waist as well to ensure that the jumpsuit will fit over the hips!). I lengthened at the bodice by 3/4 inches and at the legs by 1 inch, but I ended up not needed the extra inch in the legs. I did make a thin thigh adjustment, shaving about 3/8 inch off the inside of each thigh (taking it off the outside affects the fit in the hips instead).

Pleased with fit in the rear.
The instructions were very clear and beautifully illustrated with diagrams, which I prefer to pictures. I used a cotton blend from my stash, with colors and a pattern I love. I cut the waistband and the pockets on the bias for contrast. The only other deviations from the pattern were to leave off the pocket buttons because I didn't have enough buttons and to omit the elastic at the cuffs. This was because I made a poor fabric choice, and selected a fabric with insufficient drape (despite Kennis's clear instructions!), making my jumpsuit legs look like pirate pants when gathered with elastic. I should have taken pictures so you could have a good laugh--you'll just have to take my word for it. I will definitely be making a jumpsuit in a drapier fabric in the future, since I love the way everyone else's gathered legs look!

I especially love the cut-on cuffed sleeves.
I hope to be able to test again for Kennis (and for others as well!). I really enjoyed the experience, and ended up with a lovely garment from a pattern that I might have been afraid to try otherwise. I am now totally into the whole jumpsuit thing!

Baby bump
I am now almost 20 weeks pregnant, so my sewing plans for the year have been somewhat interrupted! I have not been blogging, but I have been doing quite a bit of sewing, and even got some of my #2017makenine makes done before my tummy intervened! Now I have a whole new ambitious set of maternity sewing plans--I will try to share those soon.

Thursday, January 5, 2017

Frocktober No. 1


Inspired by Froctober on The Monthly Stitch, I made two dresses on my Fall 2016 Makes wish list. The first is Vogue 8766, view D. Vogue describes it as a lined dress with a fitted, sleeveless, underlined bodice, French darts, and a scooped neckline.

You can see the style lines well in this drawing:
I used a cotton fabric purchased at The 15th Annual World's Largest Textile Garage Sale. The dates for 2017 are already on my calendar! This is an awesome awesome event. The fabric feels like a quilting cotton, so a bit thin for a fall dress. However, the bodice is underlined, which adds to the warmth (not to mention decreasing wrinkling, with the heavy cotton blend that I chose to use). I intend to wear this dress with sweaters, cardigans, and tights for the next few months. The rich jewel tones are so cozy for a fall/winter wardrobe! 

I used size 6 at the bust grading to 10 at the waist and hips. I thought I could get away without a toile, but this was a poor decision. I had to use a 3/4 inch seam allowance at the bust and 3/8 inch seam allowance at the waist! The bodice was also too short, so I added a waistband cut on the bias (to avoid pattern matching and because it looked awesome). Lesson learned: a toile of the bodice for a new pattern is always indicated! (Although I really like the waistband, so I'm kind of glad I made this mistake.) I added some tucks on the front of the bodice--I think it gives it a vintage feel:


Since this was intended to be winter appropriate, I had originally planned to make view F, with the 3/4 length sleeves. However, the bodice for both sleeved and sleeveless versions was the same, so, not surprisingly, I did not have enough ease to move my arms easily! Here it is on my old dressform, Ms. Blueberry, before I took the arms off the dress:


I wanted a clean, demi-couture finish on the inside, so I turned the seam allowances under and hand-stitched them to the underlining. I don't know if there is a special name for this technique! The neckline and armholes were finished with bias binding made from the fashion fabric. The waistband is interfaced with a lightweight fusible interfacing (Pro-Woven Light Crisp Fusible Interfacing) as well as a stiff interfacing (Pro-Woven Super Crisp Fusible Interfacing), then hand-sewed on the waistband lining after ironing under the seam allowances (per the "Couture Waistband" instructions in The Dressmaker's Techniques Bible). 


I used a dark red invisible zipper purchased from Joann Fabrics. So proud of my pattern matching at the back!


The lining for the skirt was Ambiance Bemberg rayon in Cardinal. I chose the color based on my Vogue Fabrics swatch card, but was able to find the right color at Joann Fabrics and avoid the cost of shipping (my local Joann's is hit or miss in their color supply for Ambiance). The lining was hemmed by machine, but I used lace hem tape for the skirt and made a 1.5 inch hem by hand, rather than the narrow hem recommended in the pattern. I know some people find lace hem tape to be "Becky Homecky", but I love it! It reminds me of homemade dresses and skirts I had as a child. There was a disaster when I was trimming off the extra hem after sewing on the hem tape. I make a large cut several inches above the fold of the hem! I was not about to make the dress any shorter. I used Pro-Sheer Elegance Light Fusible Interfacing to hold the cut together from the inside and applied Fray Check to avoid any loose threads from the outside. The repair is pretty subtle (especially down at the hem) and I'm hoping it will continue to look good after washing!


Here it is from the side:

And with a sweater, as it's being worn in the winter! I think it's probably easier to layer without those 3/4 length sleeves. (I really do have legs--the navy blue tights are just blending into the dark floor!)


I'm happy with this dress--a nice project to follow the failure of my denim Ginger skirt! Next up, my #2017make9, then another dress from Frocktober (I am a couple months behind in posts!)