Until I started reading sewing blogs about 6 months ago, I never even considered sewing my own jeans, and I certainly would never have considered wearing a jumpsuit, let alone a denim jumpsuit. Now, having been influenced by some inspirational ladies (especially Lauren of
Lladybird and Marcy of
Oonaballoona) I took the plunge. Portia's
Refashioner's 2016 Jeanius Challenge was the final tipping point; a jean jumpsuit now seemed an absolute necessity.
I bought two large pairs of dark wash denim jeans at a Goodwill in early September; I know a lot of folks have been mixing different washes but I wanted my jumpsuit to be one solid color. They match pretty well, considering they are different brands. There is a difference in shade if you look closely, but not one that I find bothersome (unfortunately, I lost the "before" picture of the jeans, but one makes up the top and the other the bottom of the jumpsuit). I pinned a few looks on a
Pinterest board, then used
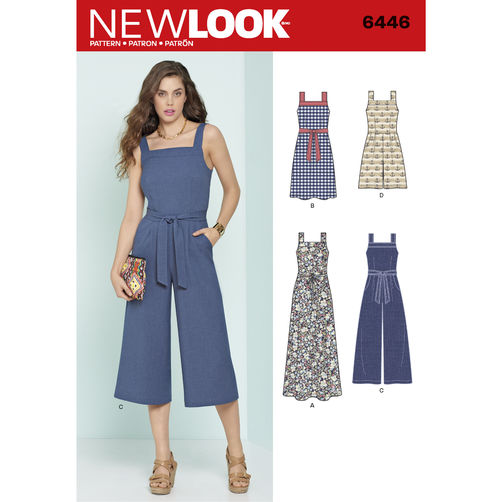
NewLook 6446 as a design starting point. Other than the used jeans and the NewLook pattern, I only used stash supplies.
I started with the pants, since they were the scariest portion. I kept the fly intact, but unpicked the waistband, side seams, and inseams. I based the hip and thigh shape on a pants sloper that was an August make (Vogue 1003), then pinned on the jeans on myself to get the final shape that I wanted. Unlike NewLook 4664, there are no darts at the leg waist, since the jean material had a decent amount of stretch. I cut just inside the pockets for the front, then modified the NewLook front hip pocket pattern using remnants from a cotton shirt for the pocket bags. This fabric came from my grandma's stash--the shirt had already been cut in pieces and partly used for other projects. There was enough left to make the pocket bags and a facing for the top band on the bodice.

The seams were finished with a 3-thread overlock stitch on my serger, and topstitching was done using gold topstitching thread in my stash (also inherited from my grandma) that matched the topstitching on the fly and back pockets. I used regular thread in the bobbin--this is the first time I have used different weight thread on the top and bottom, and it turned out much better than previous attempts to use topstitching-weight thread on both sides.

I sewed the crotch and the inseam and topstitched, leaving the side seams open to sew in one fell swoop with the bodice, as well as leaving the back seam open a good 6 inches to allow for back zipper insertion. The fit in the legs seemed reasonable at this point, so I worked on putting together the bodice. I drafted new pattern pieces for both front and back bodice from NewLook 4664, completely eliminating the waist dart in the back and significantly decreasing it in the front. This was partly to avoid bulk, but also to work within the limitation of the width of fabric in 2nd pair of jeans.

I was pretty pleased with the basted fit of the bodice, so sewed the front and back bodice pieces to their respective leg pieces, then sewed up the side seams. The legs I kept as wide as I could within the limitations of the jeans. Unfortunately, I had trouble with twisting of the lower legs once I got the top portion fitted perfectly. The inseam twisted out to the front of my leg by the time it reached my foot. After looking through lots of sewing books and blogs, I decided that the issue was not in the leg but in the butt fitting. Of course I did not figure this out until the bodice was attached and the seams were serged! I detached the back bodice and undid the side seams (at least these were basted), pulled the back leg pieces up significantly in relation to the front pieces, then sewed the legs back together. Much better! Pants fitting is still a bit of a mystery to me--the three-dimensional shape of the pelvis and how fit there is translated to the lower limbs is kind of crazy. I'm looking for books to add to my library on this subject.
Pants for Real People by Patti Palmer seems like the best option.
Now I had a new problem: the front and back waist seam were at different heights, and the back patch pockets were very high on my butt. I considered adding a strip of fabric as a waistband to disguise the difference in seam heights, but decided that I liked the funky look, and would highlight the
mistake design feature with topstitching. I also considered lowering the patch pockets, but the fabric underneath was significantly darker, so I decided the high positioning was also a "design feature." Sometimes better is the enemy of good, right?
I inserted a simple slot seam zipper using a bright pink zipper removed from a thrifted pillow (bought for the cushion, not the cover) that picked up the pink in the pocket bags. I like the way the zipper pull peeks out and provides some contrast. I sewed on the straps exactly per the pattern, then cut a front facing and some bias strips from the pocket bag fabric for the top of the bodice, rather than inserting a full bodice lining as suggested (the bodice certainly did not need any more bulk).
I added as much topstitching as I could--I only had 12 inches of topstitching thread left on the spool when I was done, so that was the limiting factor! I'm pretty pleased with how these turned out. I learned a ton about pants fitting, worked on my topstiching technique, used up a few stash items, and made something lovely out of a couple pairs of unloved jeans. Thanks for the challenge, Portia!