Sunday, December 25, 2016
Bloglovin
<a href="https://www.bloglovin.com/blog/18397279/?claim=h4bxgaujusb">Follow my blog with Bloglovin</a>
A Tale of Two Pouching Pockets

I had high hopes for this make, but I'm not pleased about how it turned out! I used the Ginger pattern, version 1, from Colette Patterns and indigo denim fabric from Vogue Fabrics in Evanston, IL. I'm not sure which denim it is--it's pretty heavy, with minimal stretch and minimal recovery. That might have been the source of some of my issues.
I interfaced the denim for the waistband to support the center point, but used fabric from an old skirt for lining the waistband to prevent it from getting too thick. I used the same fabric to add in-seam pockets.

I finished all the exposed seams with a 3-thread overlock stitch to prevent fraying. I topstitched using normal thread in a double thickness. I wanted something more subtle than the usual gold or yellow topstitching usually used with denim, since I wanted to be able to wear this skirt in a more professional setting. I combined navy thread and a brighter blue thread for a bit of contrast, and I like the way it turned out! The hem was turned over twice and topstitched.

I think that the bottom of the skirt--especially in the back--sticks out in a funny way. The skirt wrinkles quickly and obviously. Finally, the pockets pouch out and interfered with the smooth line of the side seam.


As you can tell by these pictures, I am several months behind on blog posts! I had hoped that a few washes would help things hang better, but this doesn't seem to be the case. If anything, it's gotten worse:

I think that by taking in all the seams and making the skirt less A-line, it might hang better. Perhaps this fabric is just not right for a Ginger skirt! I have about 1.5 yards of the fabric left--I plan to wash it a few more times and find a more structured pattern without any bias-like seams (if I bring myself to try again).
Tuesday, October 4, 2016
T-shirts Galore!

Over the past couple months, I've added a few knit tops to
my wardrobe. I've been working on perfecting the fit. After I started trying to
fit these tops, I started looking critically at my RTW knit tops, and was
surprised at how few of them actually fit me. Looking at fit on others wearing
knit tops, I don't think RTW is actually designed to fit anyone--more like just
not fit too badly.
First, I make a Sewaholic Renfrew in size 6, view B. I
basted using a long stitch on my sewing machine, then used my serger for the
final seams. I used fabric from several old pieces of clothing for
color-blocking. I love mustard yellow, but I'm not sure it looks that great
close to my face, so this was a good way to incorporate that color! I had to
add a center back seam to fit my pattern onto the fabric I had, and I really
like the way it looks. I ended up taking the shoulder seams by about 3/8"
and taking the side seams in a bit as well, so I decided to make a size 4 the
next time I used the pattern.


Next, I tried a free pattern, Skinny Bitch Curvy Chick Tonic
Tee. This fit me best in an XS. I used some blue and white-striped bamboo knit
that I bought from Vogue Fabrics in Chicago in the spring. The fabric is so
beautifully soft but was not very easy
to work with, at least not for someone so inexperienced with knits. I cut on a
single layer to try to match the stripes at least a bit (and failed miserably),
and I used a small rotary cutter, which was extremely helpful (not an affiliate
link!). For this one, I also used some clear elastic in the shoulder seams for
more support.


To try the Renfrew in size 4, I used an XXL T-shirt rescued
from the thrift store. The fabric is a lovely light gray heather, is very
comfortable against the skin. I cut a size 4, view B. Instead of using bands at
the sleeves and waist, I hemmed them with a twin needle and woolly nylon in the
bobbin. I did get some tunneling with this--next time I will try adjusting the
bobbin tension or invest in some knit stay tape. Although the fit feels fine
when I'm wearing it, it seems a bit tight under the armpits--though it seems not very noticeable in these photos.


Finally, I drafted a boat-neck knit top using the body of
the Renfrew, the sleeve cap of the Tonic, and the neck and shoulders of a very
old shirt from Old Navy that fit me the best out of all my fitted knit tops. I
used a red and white striped cotton knit from Joann Fabrics, which doesn't seem
to be available anymore (at least not online). The top is inspired by a Breton
shirt. If you are interested in a bit of history or a commercial or indie
pattern suitable for your own Breton shirt, Julie of Jet Set Sewing has a
lovely post on the topic. I cut the neck band on the bias, to break up the
stripes a bit. My husband tells me that it fits well, but that I look like a
candy cane or Waldo (thanks for taking the photos, dear!). The sleeve bands
gave me quite a bit of trouble with making sure the stripes matched up
reasonably well, but I finally wrestled them into submission! The next time I
make a knit top with stripes, I will either skip the sleeve band (as I did for
the Tonic) or cut it on the bias, as I did for the neck band, with good
results. I did a better job on matching the stripes on this one than I did on
the blue/white T.


Fall is finally here in Minnesota--it was late in
coming this year. My next make is a denim skirt, which will be perfect with
tights and a sweater. I love this season!
Wednesday, September 28, 2016
Jeanius Jumpsuit

Until I started reading sewing blogs about 6 months ago, I never even considered sewing my own jeans, and I certainly would never have considered wearing a jumpsuit, let alone a denim jumpsuit. Now, having been influenced by some inspirational ladies (especially Lauren of Lladybird and Marcy of Oonaballoona) I took the plunge. Portia's Refashioner's 2016 Jeanius Challenge was the final tipping point; a jean jumpsuit now seemed an absolute necessity.
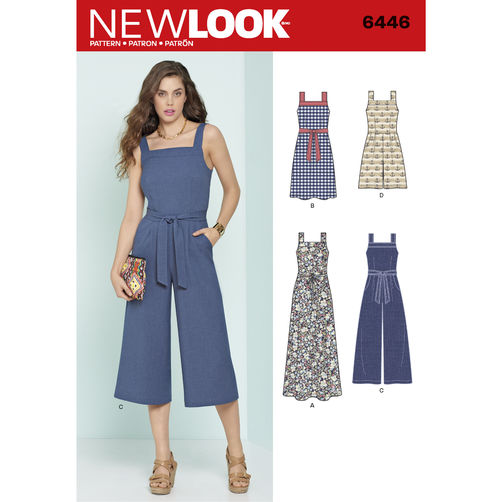
I bought two large pairs of dark wash denim jeans at a Goodwill in early September; I know a lot of folks have been mixing different washes but I wanted my jumpsuit to be one solid color. They match pretty well, considering they are different brands. There is a difference in shade if you look closely, but not one that I find bothersome (unfortunately, I lost the "before" picture of the jeans, but one makes up the top and the other the bottom of the jumpsuit). I pinned a few looks on a Pinterest board, then used NewLook 6446 as a design starting point. Other than the used jeans and the NewLook pattern, I only used stash supplies.

The seams were finished with a 3-thread overlock stitch on my serger, and topstitching was done using gold topstitching thread in my stash (also inherited from my grandma) that matched the topstitching on the fly and back pockets. I used regular thread in the bobbin--this is the first time I have used different weight thread on the top and bottom, and it turned out much better than previous attempts to use topstitching-weight thread on both sides.

I sewed the crotch and the inseam and topstitched, leaving the side seams open to sew in one fell swoop with the bodice, as well as leaving the back seam open a good 6 inches to allow for back zipper insertion. The fit in the legs seemed reasonable at this point, so I worked on putting together the bodice. I drafted new pattern pieces for both front and back bodice from NewLook 4664, completely eliminating the waist dart in the back and significantly decreasing it in the front. This was partly to avoid bulk, but also to work within the limitation of the width of fabric in 2nd pair of jeans.

I was pretty pleased with the basted fit of the bodice, so sewed the front and back bodice pieces to their respective leg pieces, then sewed up the side seams. The legs I kept as wide as I could within the limitations of the jeans. Unfortunately, I had trouble with twisting of the lower legs once I got the top portion fitted perfectly. The inseam twisted out to the front of my leg by the time it reached my foot. After looking through lots of sewing books and blogs, I decided that the issue was not in the leg but in the butt fitting. Of course I did not figure this out until the bodice was attached and the seams were serged! I detached the back bodice and undid the side seams (at least these were basted), pulled the back leg pieces up significantly in relation to the front pieces, then sewed the legs back together. Much better! Pants fitting is still a bit of a mystery to me--the three-dimensional shape of the pelvis and how fit there is translated to the lower limbs is kind of crazy. I'm looking for books to add to my library on this subject. Pants for Real People by Patti Palmer seems like the best option.

Now I had a new problem: the front and back waist seam were at different heights, and the back patch pockets were very high on my butt. I considered adding a strip of fabric as a waistband to disguise the difference in seam heights, but decided that I liked the funky look, and would highlight the
I inserted a simple slot seam zipper using a bright pink zipper removed from a thrifted pillow (bought for the cushion, not the cover) that picked up the pink in the pocket bags. I like the way the zipper pull peeks out and provides some contrast. I sewed on the straps exactly per the pattern, then cut a front facing and some bias strips from the pocket bag fabric for the top of the bodice, rather than inserting a full bodice lining as suggested (the bodice certainly did not need any more bulk).

I added as much topstitching as I could--I only had 12 inches of topstitching thread left on the spool when I was done, so that was the limiting factor! I'm pretty pleased with how these turned out. I learned a ton about pants fitting, worked on my topstiching technique, used up a few stash items, and made something lovely out of a couple pairs of unloved jeans. Thanks for the challenge, Portia!

Subscribe to:
Posts (Atom)